EntryField with Multi-line label demonstration : Pmw Multi line label « GUI Pmw « Python

Python
1. 2D
2. Application
3. Buildin Function
4. Class
5. Data Structure
6. Data Type
7. Database
8. Development
9. Dictionary
10. Event
11. Exception
12. File
13. Function
14. GUI Pmw
15. GUI Tk
16. Language Basics
17. List
18. Math
19. Network
20. String
21. System
22. Thread
23. Tuple
24. Utility
25. XML
Java
Java Tutorial
Java Source Code / Java Documentation
Java Open Source
Jar File Download
Java Articles
Java Products
Java by API
Photoshop Tutorials
Maya Tutorials
Flash Tutorials
3ds-Max Tutorials
Illustrator Tutorials
GIMP Tutorials
C# / C Sharp
C# / CSharp Tutorial
C# / CSharp Open Source
ASP.Net
ASP.NET Tutorial
JavaScript DHTML
JavaScript Tutorial
JavaScript Reference
HTML / CSS
HTML CSS Reference
C / ANSI-C
C Tutorial
C++
C++ Tutorial
Ruby
PHP
Python Tutorial
Python Open Source
SQL Server / T-SQL
SQL Server / T-SQL Tutorial
Oracle PL / SQL
Oracle PL/SQL Tutorial
PostgreSQL
SQL / MySQL
MySQL Tutorial
VB.Net
VB.Net Tutorial
Flash / Flex / ActionScript
VBA / Excel / Access / Word
XML
XML Tutorial
Microsoft Office PowerPoint 2007 Tutorial
Microsoft Office Excel 2007 Tutorial
Microsoft Office Word 2007 Tutorial
Python » GUI Pmw » Pmw Multi line labelScreenshots 
EntryField with Multi-line label demonstration


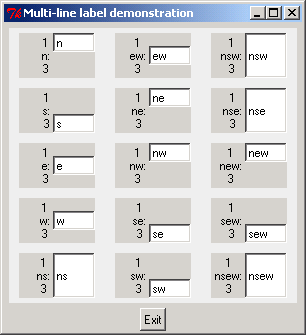
title = 'Multi-line label demonstration'

# Import Pmw from this directory tree.
import sys
sys.path[:0['../../..']

import string
import Tkinter
import Pmw

class Demo:
    def __init__(self, parent):

        frame = Tkinter.Frame(parent, background = '#eeeeee')
        frame.pack(fill = 'both', expand = 1, padx = 5, pady = 5)

        stickys = ('n''s''e''w''ns', 'ew', 'ne', 'nw', 'se', 'sw',
                'nsw', 'nse', 'new', 'sew', 'nsew',)

        widgets = []
        row = 0
        column = 0

        # Choose one megawidget class to demonstrate:
        cls = Pmw.EntryField
        # cls = Pmw.Counter
        # cls = Pmw.ComboBox
        # cls = Pmw.LabeledWidget

        for sticky in stickys:
            dict = {}
            dict['sticky'] = sticky
            dict['labelpos'] 'w'
            dict['label_text'] '1\n' + sticky + ':\n3'
            if cls == Pmw.EntryField:
                dict['value'] = sticky
                dict['entry_width'] 6
            if cls == Pmw.Counter or cls == Pmw.ComboBox:
                dict['entryfield_value'] = sticky
                dict['entry_width'] 6
            widget = apply(cls, (frame,), dict)
            if cls == Pmw.LabeledWidget:
                f = Tkinter.Button(widget.interior(), text = sticky)
                f.pack(fill = 'both', expand = 1)
            if cls == Pmw.MessageBar:
    widget.message('state', sticky)
      widget.grid(column=column, row=row, sticky='ew', padx = 10, pady = 5)
      frame.grid_columnconfigure(column, weight=1)
      frame.grid_rowconfigure(row, weight=1)

            widgets.append(widget)

            if row < 4:
                row = row + 1
            else:
                row = 0
                column = column + 1

        Pmw.alignlabels(widgets, sticky = 'e')

######################################################################

# Create demo in root window for testing.
if __name__ == '__main__':
    root = Tkinter.Tk()
    Pmw.initialise(root)
    root.title(title)

    exitButton = Tkinter.Button(root, text = 'Exit', command = root.destroy)
    exitButton.pack(side = 'bottom')
    widget = Demo(root)
    root.mainloop()


Related examples in the same category
1. MessageBar: Multi-line label demonstrationMessageBar: Multi-line label demonstration
www.java2java.com | Contact Us
Copyright 2009 - 12 Demo Source and Support. All rights reserved.
All other trademarks are property of their respective owners.